The following will demonstrate how to use the remote control included in the Rokit Smart kit.
| Please note that you can enter the remote control program by either selecting program 13 or by placing dipswitch 3 up prior to turning on the Smart Inventor Board. | 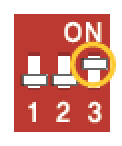 |
Remote Control Channel Configuration
You can control a robot when the robot’s mainboard and controller have the same channel. Please note that there are only 4 channels that you can use with RokitSmart.You may only change the channel configuration when you are in remote control mode.
Mainboard Channel Set-up
You can set up the channel by lifting a switch up or down. You can change the channel while you are controlling the robot.
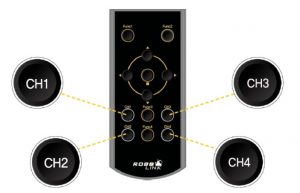
Controller Channel Set-up
You can set up a channel for the controller by using the remotes’ buttons CH1, CH2, CH3, and CH4, these can be found on the bottom portion of the remote.
- Place your robot in remote control mode by either selecting program 13 or flipping dipswitch 3 up.
- Set the dipswitch on your smart inventor board to the proper orientation based on the above image.
- Select the button channel corresponding to the selected dipswitch orientation, by pressing and holding the button down for approximately 3 to 5 seconds. This will prompt the red led on the remote to flash.
- This should allow you to use the remote with your robot.